Overview:
Most dashboards are moving to a mandatory MFA requirement on the website logins. Some websites that require MFA also allow for 3rd party authenticators such as Google Authenticator. These 3rd party authenticators work off either the TOTP or HOTP one-time password standards accepted by the OATH (Open AuTHentication) membership.
Important Note
It is very important that you do the initial setup and login through a desktop browser to confirm it works as expected before attempting to setup MFA on a dashboard within Skykit Beam
General Setup Process:
The initial setup for MFA can be difficult. Please don’t hesitate to reach out to support.skykit.com
Prerequisite steps before adding a MFA Key within Skykit Beam
Creates a special “dashboard” account on the service provider you want a dashboard for.
If this account was already created and has MFA enabled, you will need to disable and re-enable the MFA so that we can generate a new QR code.
When prompted to setup MFA for the account, select the TOTP.
A prompt will display a QR code for scanning with authenticator apps. Alternatively, there's a "key" version that presents the MFA secret code as text instead of QR. Accessible via a button labeled "I can't scan this" near the QR code, Skykit Beam will require the text version of this key.
Note
If you do not see the "I can't scan this" button, you will need to contact support@skykit.com for further instructions
Steps within Skykit Beam
Create a dashboard content within Skykit Beam and continue to Step 2
On Step 2: “How do you want to log in to your dashboard?”, select the Multi-Factor Authentication (TOTP)
Continue to Step 3: “What is the username and password used to log in to your dashboard?”, and select the option to create a new dashboard username and password.
Enter the username and password used to access your dashboard
Copy this key from the MFA service provider and paste it in the field where the MFA key is requested
Finish setting up your MFA account or SSO account
Once the key has been saved with the dashboard credentials in Skykit Beam, finish setting up the account on the service providers site by using a 3rd party authentication app to finish the setup like normal.
Once the account is created the dashboard can be played on Skykit devices.
Note:
As stated, this process will only work for websites that allow 3rd party authenticators or give access to a TOTP secret key in some way. If the only MFA option available is an in-house texting/email MFA on the service providers part, we will need an alternative solution.
Setting MFA (2FA) for Sisense
Important Note: It is very important that you do the initial setup and login through a desktop browser to confirm it works as expected before attempting to setup MFA on a dashboard within Skykit Beam.
If you already have 2FA setup for the account you want to use in Skykit Beam, please scroll down to the Resetting Two-Factor Authentication section of this doc and follow the instructions.
Setting up 2FA for the First time
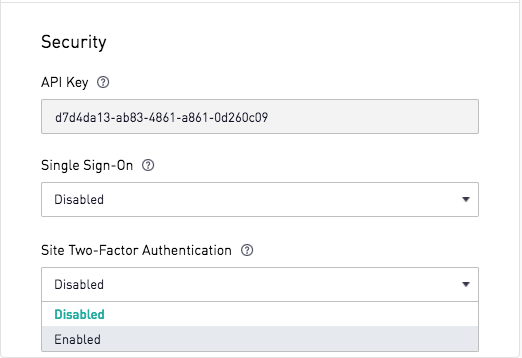
An Administrator can set up 2FA by clicking the Settings icon and navigating to the Billing & Security Option.
Next, Enable 2FA under Site Two-Factor Authentication.
Note: Once a site administrator has Enabled 2FA, existing logged in users' Sisense pages will automatically refresh. Users will then be prompted to complete 2FA setup immediately.
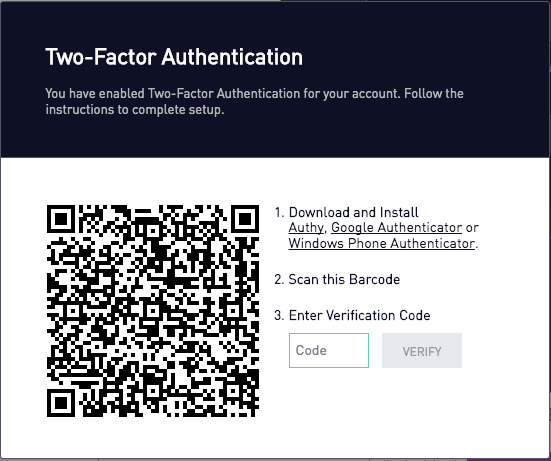
Once you enable the Enable 2FA setting, you should be prompted with a pop-up showing a QR Code.
Next, take a screenshot of the QR Code and email it to support@skykit.com. In the description of the email, please detail that you are trying to set up a Sisense dashboard with MFA. Skykit support will email you back with a secret key. This secret key is used for creating / updating credentials in Skykit Beam when creating a dashboard content with MFA (TOTP) login option. Note: The secret key is different from the Verification Code that is asked in the image above. Verification codes are given to you by 3rd party authenticators.
Next, please continue and follow the instructions in the pop.
a. Download a 3rd party authenticators such as Google Authenticator, Authy, or Microsoft Windows Phone Authenticator
b. Scan the Barcode / QR Code
c. Enter the Verification URL
Open an incognito window in your browser and proceed to log into Sisense using the credentials of the account designated for use in Skykit Beam. This verification ensures the seamless integration and functioning of the setup. Confirming successful login establishes that the configuration has been executed accurately and the system is operational as intended.
Log into Skykit Beam and start creating a Dashboard content.
In Step 1, select Sisense in the dropdown menu and paste the Sisense dashboard url you’d like to display.
In Step 2, select the Multi-Factor Authentication (TOTP) option from the dropdown menu as the way you want to log in.
In Step 3, select +Add a new dashboard username and password from the username list, then enter a username and password for your dashboard software in the fields. In the Secret Key field, paste the secret key that was emailed to you by Skykit Support.
Follow the rest of the steps to complete the creation of your Dashboard content.
Resetting Two-Factor Authentication
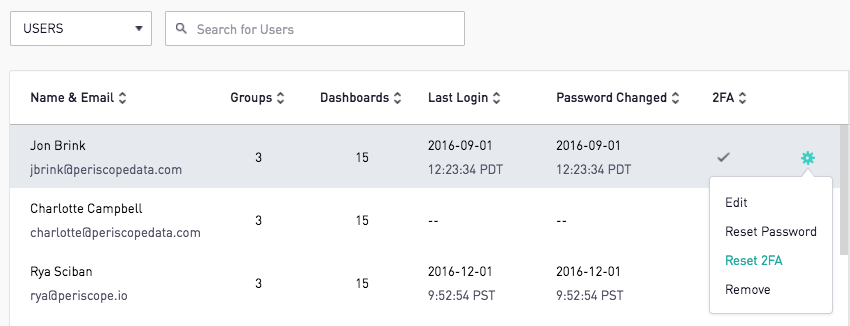
To reset a user’s 2FA settings, begin by clicking on the Settings icon, then proceed to the Permissions option. Locate the user account you want to use to display in Skykit Beam then click on gear icon.
From the menu, opt for the 'Reset 2FA' option. Upon the next time you log in as this user account, you will be prompted to reconfigure their 2FA settings.
Next time you log in, you should see a pop up with a QR Code
Take a screenshot of the QR Code and email it to support@skykit.com. In the description of the email, please detail that you are trying to set up a Sisense dashboard with MFA. Skykit support will email you back with a secret key. This secret key is used for creating / updating credentials in Skykit Beam when creating a dashboard content with MFA (TOTP) login option. Note: The secret key is different from the Verification Code that is asked in the image above. Verification codes are given to you by 3rd party authenticators.
Next, please continue and follow the instructions in the pop.
Download a 3rd party authenticators such as Google Authenticator, Authy, or Microsoft Windows Phone Authenticator
Scan the Barcode / QR Code
Enter the Verification URL
Open an incognito window in your browser and proceed to log into Sisense using the credentials of the account designated for use in Skykit Beam. This verification ensures the seamless integration and functioning of the setup. Confirming successful login establishes that the configuration has been executed accurately and the system is operational as intended.
Log into Skykit Beam and start creating a Dashboard content.
In Step 1, select Sisense in the dropdown menu and paste the Sisense dashboard url you’d like to display.
In Step 2, select the Multi-Factor Authentication (TOTP) option from the dropdown menu as the way you want to log in.
In Step 3, select +Add a new dashboard username and password from the username list, then enter a username and password for your dashboard software in the fields. In the Secret Key field, paste the secret key that was emailed to you by Skykit Support.
Follow the rest of the steps to complete the creation of your Dashboard content.
 -
-