.png")
Introduction
About this User Manual
Please read this user manual carefully and keep the manual in a safe place for future reference. Pictures in this user manual may be different from pictures shown on the display or of the player because of continuous updates.
Product Overview
The Skykit E500 lets businesses run stunning visuals on multiple display configurations, with smooth performance for videos, menus, or interactive content—all from a device small enough to fit in your hand. Built for 24/7 reliability, it simplifies digital signage with easy setup, remote management, and energy efficiency, so your displays stay vibrant without draining resources.
Intended Use
The E500 Media Player is intended for commercial use to power digital signage, video, and interactive content across single or multiple displays, with reliable 24/7 performance.
Key Features
4 x HDMI, Support hardware EDID. Up to 4096 x 2160 @60 Hz
6TOPS performance AI Boost NPU
Support Wi-Fi/BT module. Support 3G/4G module
Optional Cellular Connectivity with Purchase of Cellular Service
8 GB of memory
128 GB of storage
Compatible with Skykit Platform Solutions
Quick Start Guide
Step 1: Unbox Your Skykit E500 Media Player
Ensure you have the following items included in the package:1 x Skykit E500 Media Player
1 x Skykit E500 Media Player
1 x AC Power Adapter
1 x WiFi / Bluetooth Antenna
NOTE: You will need one HDMI cable for each of the four HDMI outputs you will be using. A USB keyboard and mouse will be also be needed for configuration if you wish to use WiFi connectivity and your player has not been preconfigured with WiFi settings. If any items are missing, please contact Skykit Support at support@skykit.com.
Step 2: Connect the Hardware
1.) Connect Antenna
Connect the WiFi Antenna with the connector to the outer antenna ports
CAUTION: Hand-tighten antenna only until snug. Do not overtighten, as this can damage the internal cables.
2.) Display Connection
Connect one end of an HDMI cable to the media player and the other end to your display screen.
Video Wall
If you plan to use multiple HMDI ports for a video wall, please see the Video Wall Configurations section below for additional configuration instructions.
3.) Network Setup
Wired: Connect an Ethernet cable from the media player to your router for a stable connection.
Wireless: Follow the WiFi setup instructions in Step 3 after powering on the player.
Cellular: Skykit offers a Cellular Enabled version of the E500 Media Player, please contact your sales person for more information.
4.) Power Connection
Plug the power adapter in the DC-IN port on the back of the E500 Media Player.
Connect the other end to a power outlet.
The player should boot up automatically. If it does not boot up, press the power button on the front of the player.
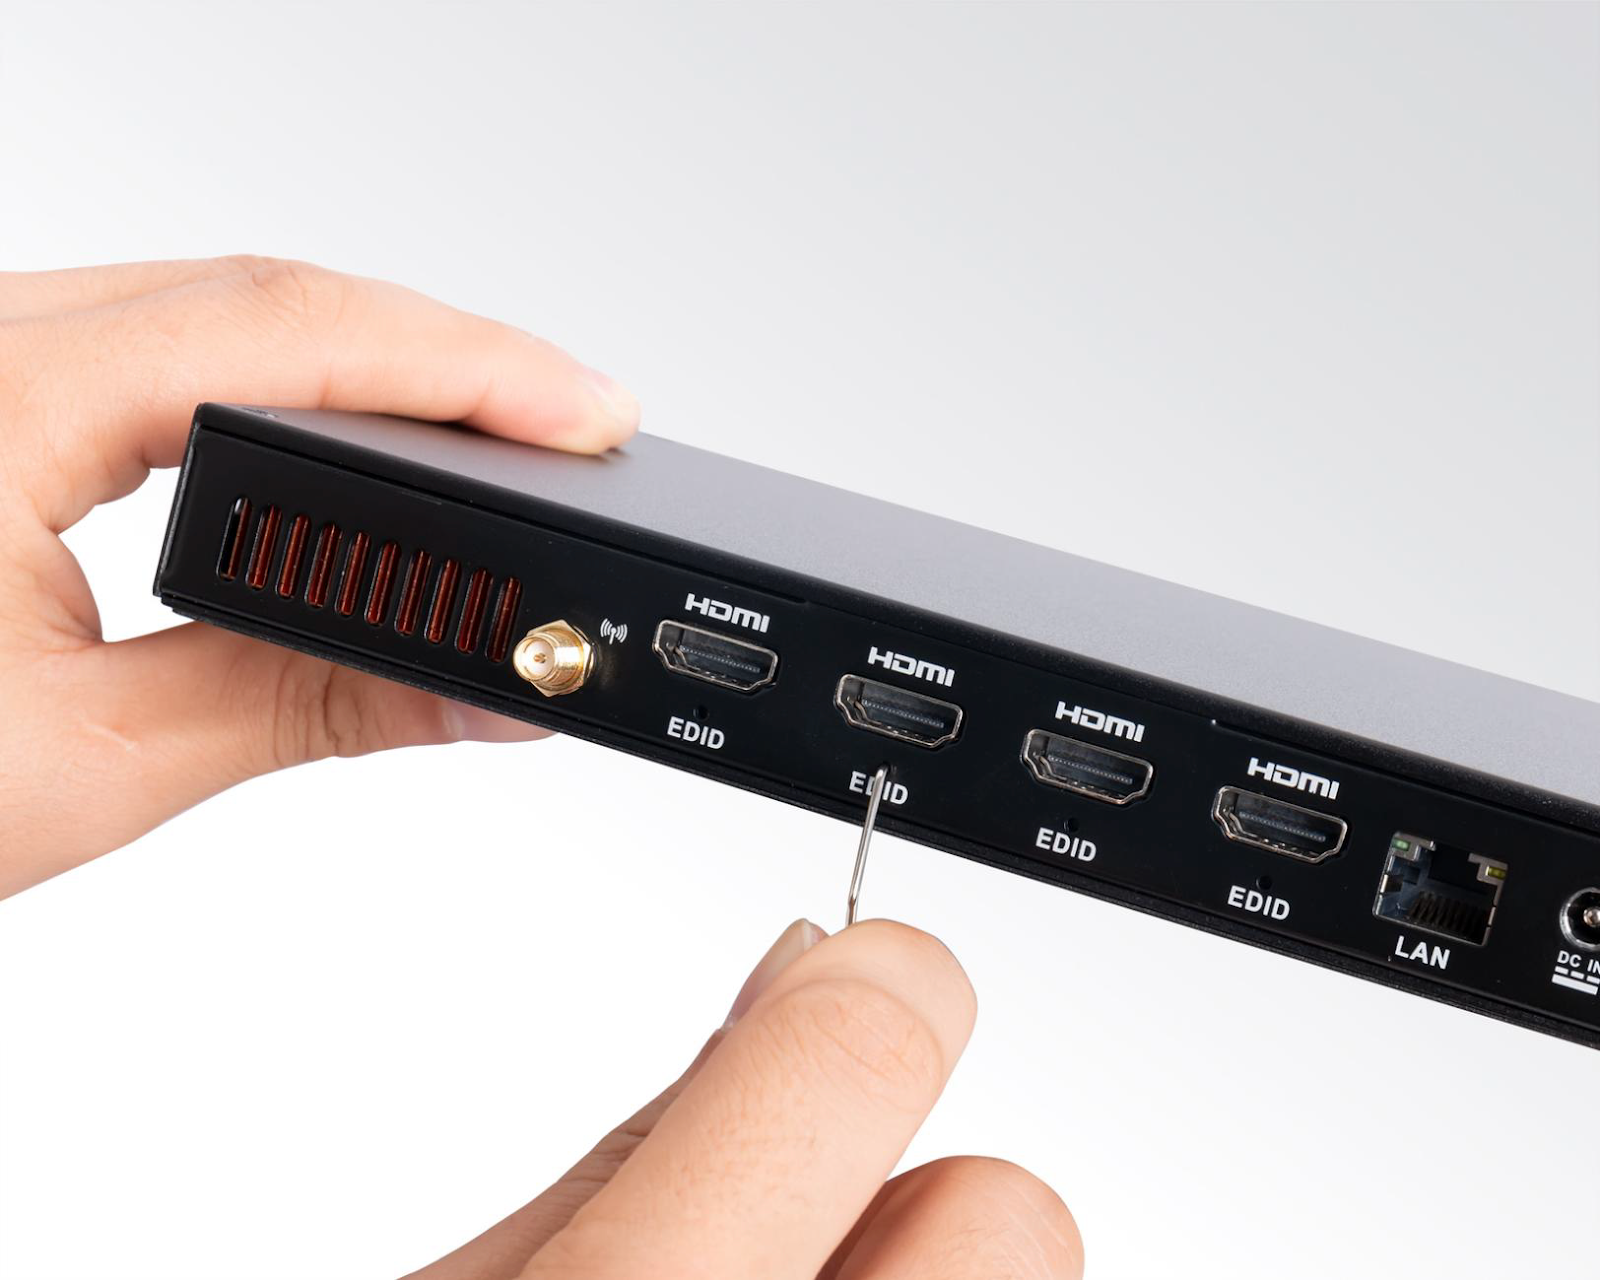
After powering on the display, you must press EDID button on each HDMI port you will be using. If this step is skipped, a black screen will appear.
Step 3: Configure WiFi
Follow these instructions if your media player has not been preconfigured with your WiFi settings, and you’re not using cellular or ethernet connectivity.
Connect a USB mouse and keyboard to the black colored USB ports on the front of the media player.
On the Skykit loading screen, click the gear icon in the lower left corner.
Choose "Edit WiFi" and select your preferred network.
Enter your WiFi password and confirm the connection.
Once connected, the player will check for updates and sync with the Skykit platform.
Step 4: Start Displaying Content
Sign in to your Skykit Account at https://accounts.skykit.com/
To login to the accounts portal, you will need to find the welcome email sent by Skykit. Go to the login page, select sign in user name/password. Enter email and hit the forgot password. That triggers a new email and allows you to select your own password.
If you have not received your account sign in information, please contact your Skykit Administrator or support@skykit.com.
Navigate to Beam Content Manager to manage and display content on your display. If you’re new to Beam and managing content on the Skykit Platform, see our helpful Beam Getting Started Guide: https://support.skykit.com/docs/getting-started-guide.
Setup Instructions
Unboxing and Package Contents

Ports and Connections

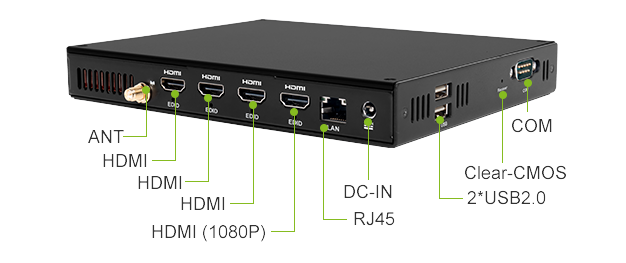
CAUTION: Hand-tighten antenna only until snug. Do not overtighten, as this can damage the internal cables..
Connect the WiFi Antenna to the antenna port from the left.
If you are using an ethernet cable for connectivity, connect the ethernet cable to the back of the media player and the other end to a LAN port.
Connect an HDMI cable to the back of the media player and the other end to your display.
Plug the power adapter into the back of the media player and connect the other end to a power outlet.
If you are using WiFi connectivity and did not have your player preconfigured with WiFi settings, please see the WiFi Setup step below.
WiFi Setup
Follow these instructions if your media player has not been preconfigured with your WiFi settings, and you’re not using cellular or ethernet connectivity.
NOTE: A USB keyboard and mouse will be required to complete this step.
Power on or restart your player.
Connect a USB keyboard and mouse to the black colored USB ports on the front of the player.
Using the connected mouse, select the Gear icon in the lower left corner of the Skykit loading window
From the Setup screen, select Edit Wifi to open a new window that lists your available networks.
Select your network to connect to it.


Once your media player has successfully connected to the internet, it will check to make sure all apps are up to date.
Technical Specifications
Dimensions
Dimensions: 189.6mm x 148.3mm x 26mm (7.46” x 5.83” x 1.02”)
Weight: 0.36 lbs (5.82 oz)
Power Requirements
Input: 12 V/2.08 A
Operating Temperature Range
Operating temperature: 0°C ~45°C (32°F~113°F) @0.7m/s Air Flow
Relative Humidity: 95%@40℃ (non-condensing)
Supported Video/Audio Formats
HD Video Output: 4K (Up to 4096 x 2160 @60 Hz)
Video Codecs:
H.265/H.264/AV1/AVS2 etc. video decoder, up to 8K@60fps
8K@30fps video encoders for H.264/H.265
Operation Instructions
Power On/Off Procedures
To turn the E500 Media Player on or off, press the power button on the front of the media player. Optionally, you may also unplug the power adapter.
Video Wall Configurations
Power on the E500
Press the EDID button on each of the desired HDMI ports. (NOTE: 1080p port required for more than one display)
Plug in HDMI to the ports you’ve enabled relative to your display layout configuration.
Choose the correct layout configuration in Control, and rotation corresponding rotation.
Save and apply your changes by rebooting the device.


Layout Configurations
1 x 1

Left Diagram: 3840 x 2160 (16:9) / Right Diagram: 2160 x 3840 (9:16)
2 x 1

Top Diagram: 3840 x 1080 (32:9) / Bottom Diagram: 3840 x 1080 (9:32)
1 x 2

Top Diagram: 1920 x 2160 (8:9) / Bottom Diagram: 2160 x 1920 (9:8)
3 x 1

Top Diagram: 5760 x 1080 (48:9) / Bottom Diagram: 1080 x 5760 (9:48)
1 x 3

Top Diagram: 1920 x 3240 (16:27) / Bottom Diagram: 3240 x 1920 (27:16)
4 x 1

Top Diagram: 7680 x 1080 (64:9) / Bottom Diagram: 11080 x 7680 (9:64)
2 x 2

Top Diagram: 3840 x 2160 (16:9) / Bottom Diagram: 2160 x 3840 (9:16)
Maintenance and Troubleshooting
Diagnostic Screen
With a mouse, click on the four corners of the screen starting with the top left going clockwise.
With a keyboard, typing in 1397
Restart the device twice within two minutes
Precautions Before Use
To prevent fire, electronic shock, and damage of the product, please do not let the player come into contact with rain, moisture, or liquid. Do not put vases or other water containers on the player.
To ensure good ventilation, please do not put the player in bookcases, cabinets, or other confined places. Keep it well-ventilated to prevent fire or electronic shock caused by overheating of the player. Keep lit candles and other hot subjects away from the player. Please do not open the case of the player. Only a specialist is allowed to do this.
Placement of Unit Issues
Please place the player on a flat area. Keep it away from sunlight and avoid heat, humidity, and frequent shaking to avoid damage to the case and other components of the player and shorten the service life of the player. For the best performance of the player, please do not place heavy objects on the player and keep it at least 6 inches away from the wall.
Power Issues
Do not use over-voltage, otherwise, the player would be damaged and might cause fire. Please connect the power cord correctly and make sure the cable is not damaged. In the United States, that means supplying 110 V to the player. Please unplug the power cord if you do not use the player for a long time to prevent damage caused by lightning.
Cleaning Issues
Please unplug the power cord before cleaning the player. Use a slightly wet rag to clean the player instead of liquid detergent. Do not use solvents like gas, because this might damage the case of the player.
Moisture Issues
Please keep the player away from any humid places, like a basement. Condensation of moisture might cause damage to the player. In this case, please turn on the player, and the heat of the player may drive the humidity away.